About the game
That game is an obscure 3D adventure game called Azrael's Tear.
It centers around the search for the Holy Grail. But in this story, it's the future (well, the date given at the start of the game is in 2012, so it's no longer the future at the time I write this). For some unexplained reason, tectonic activity has increased dramatically over the last few years and, conveniently for archeologists, has resulted in numerous previously-buried sites being uncovered.
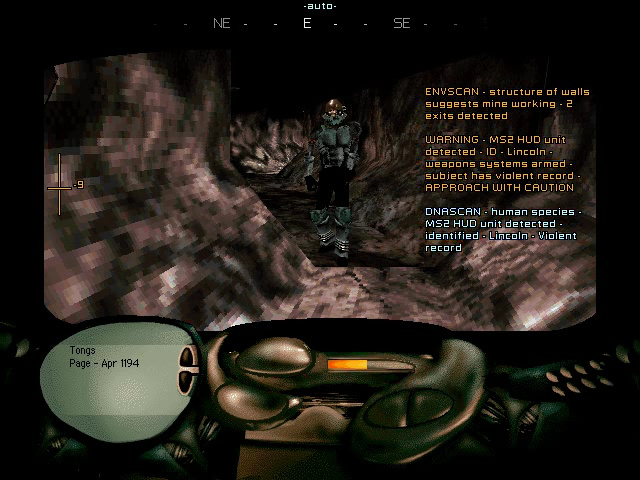
Also, a new type of tomb robber with high-tech equipment has emerged, known as Raptors (which, we're told, is "thief" in Latin; well, actually "one who seizes" according to the etymology given, but "thief" works too). Chief among their equipment is the MS-2 HUD helmet that has a number of support features, including scanning, mapping, and "twelve gigabytes of library information". The helmet is able to identify the composition and structure of things you run across and makes remarkably good guesses about the operation and purpose of a lot of them. Raptors also carry the MS-7 Sniper gun. We play as one of these Raptors.
One day, we get a letter from another Raptor, something that doesn't happen very often as Raptors are not very friendly with each other to say the least. The writer, Colin Scott, says he has found the Holy Grail, but that he seems to have gotten in too deep (the letter was to be delivered in the event of his disappearance). He includes a "last testament" supposedly written by a Sir Guy of Bramley, a Templar knight and one of the twelve chosen to guard the Grail, who lived a whopping 600 years thanks to something called "Grailstone". Colin makes an offer of half the profit in exchange for assistance, and this is where the game begins (all of the above is summarized from documents enclosed with the CD).
A sort-of review
I don't think I've gotten very far in the game yet, so this isn't really intended as a review. But I'll say a few things based on my experience so far. First, I have mixed feelings about the graphics. On the one hand, it was no doubt revolutionary to have a game in full real-time 3D graphics. It does enhance things in a sense, and some puzzles seem to at least involve 3D thinking. On the other hand, it was still a bit primitive in 1996, and even sometimes looks weird or is just plain difficult to interpret. Some examples: |
| That's water?? |
 |
| Legibility problem! |
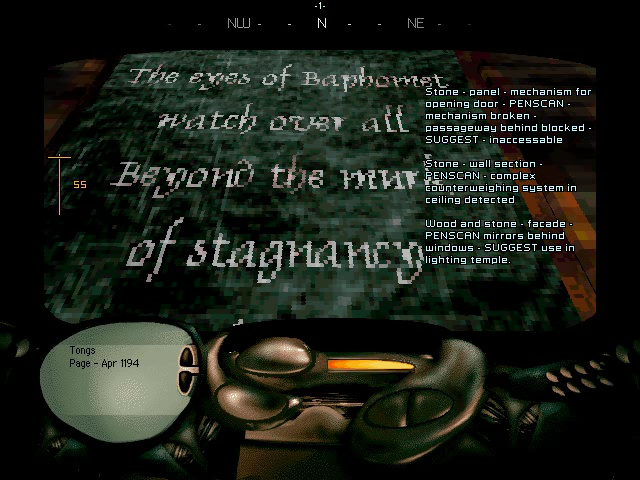 |
| "Baphomst"?? |
 |
| Can you spot what's takeable here? |
 |
| What about here? |
 |
| And here? |
On a minor note, this game came out around the same time as Quake, which both looks better and, I think, ran better on contemporary hardware. I wonder what would have happened if Intelligent Games had talked to Id. Well, just an idle fantasy. :-)
The controls are not too bad, though they do take some getting used to. For moving around, one can use the keyboard — up and down to move forward and back, left and right to turn, < and > to move sideways, and Page Up and Page Down to look up and down — and/or the mouse. But the way the mouse is set up is strange: Just moving it moves a cursor, which can be clicked on buttons and objects in the world with the left button. If you want to turn, you have to hold down the right button and move the mouse. Up and down is also the opposite of what you'd expect — up looks down, and down looks up — and you have to press F10 to switch to the more intuitive mode. Walking forward is accomplished by pressing the left button while the right button is held; you can move forward this way but not backward, so it's a good idea to keep one's other hand near the arrow keys.
The music, composed by Kerry Minnear, is where this game really shines. Here are a couple of examples as heard from a Roland SC-55mkII Sound Canvas:
Even on the lowly Sound Blaster, it sounds pretty good:
Strangely enough, it doesn't seem to sound very good on an MT-32, one of the other premium sound modules of the early PC era. It might have something to do with this being a bit past the MT-32's heyday. Still, there are other games with music targeted for General MIDI where the MT-32 at least sounds decent. Not in this case, though. (Or is there just something wrong with my equipment or setup? FYI, this is an actual MT-32, not an emulation.)
And that's not the worst one I've heard so far. If you want more, here is a comparison playlist.
Puzzle thoughts (and speculations)
Well, as of session 4,First of all, I've cobbled together a map of the area I can access so far, based on the MS-2 map screens. Please forgive the roughness; I didn't want to bother too much with cleaning them up, and things don't fit together very well, probably because the map sections are given at arbitrary scales. I drew extra white lines to connect things where necessary.

Going room-by-room, here are my current thoughts on puzzles and other stuff:
"Spa"
Name given by the HUD. Well, I guess the "spa" is really just a water tank. It's certainly too hot for bathing, let alone swimming. Falling in is instant death.But anyway, there's a locked door on the east side and a large pipe that pumps water up, where a crank switches it between two more sections of pipe on the south side; you can also put it in a neutral position, not connected to either.
Working area
The water from the tank powers two machines in the working area, up on an inaccessible platform on the north side. One is a saw, and one is a crusher. There's also a crane with a large grabbing claw in the working area, which is used to pick up stone blocks from the floor and load them into the machines. One of the blocks (identifiable by large cracks) contains a key that can be extracted with the saw.There's also a car on rails, with its own grabbing claw, facing giant double doors on the east side; it won't move unless the doors are open, and I haven't worked out how to open them yet, but it might just be from the other side.
Finally, there's a large chasm running north-south near the west side; a mutated man named Lurka was trapped on a ledge at the start, but I got him upset at me, and he seems to have escaped on his own (or maybe fallen to his death trying?).
Chapel
That's my name for it, anyway. It does seem to be related to worship, as there are fonts and basins large enough for a person to submerge in (baptismals, according to the HUD). The room is divided into north and south halves by a wall with three large (very broken) mirrors or windows; I'm not sure which, because the two sides are almost mirror images, so it seems like it was intended as a trick of some kind. Now, though, one can simply walk through one of them. The basin in the south side can be drained (see below about the well) to reveal a glass prism.Up on a platform on the north side of the south half is a platform with four panels. One panel contains a section of tapestry; the others are blank. Two of the missing sections are right there on the platform (but good luck spotting them, as noted before); the other is far away. The panel that already had a piece of tapestry can be flipped over to reveal a riddle: "The eyes of Baphomet / watch over all / Beyond the murk / of stagnancy / His face lies / crystal clear". (Watch my LP for a little about Baphomet; or read Wikipedia for more info.) This is a hint about the fonts and the prism, since the water in the fonts is extremely stagnant.
The south font has a stone carving of a bible with a slot in it. Put the prism in that slot, and the font rises up about a foot. Stand on a conspicuous spot on the south side (pressure-sensitive, as the HUD reveals) and look into the prism to see a stone head and hear the voice of a man warning about what lies ahead; a mostly-hidden door in the southwest corner then opens to reveal a shield with the words "The way forward lies in prayer. Follow the path of the cross" written on it. The only crosses I've seen so far in this allegedly Christian place are in the tapestry, so I haven't figured out what this means.
Well
This room has a well with hot water and a 400-year-old corpse. (Remarkably well preserved, isn't it? There might be a reason for that, which I'll cover later.) Next to the corpse is another key. When one first approaches the well, a ghost appears, calling out for someone named Oisin (pronounced "oh-SHEEN"), which is apparently the aforementioned corpse. :-(In another corner is a sort of control panel with sections of pipe that can be pulled out, turned, and moved up and down, connecting one of three ports on either side to two of five ports down the center. One arrangement drains the south basin in the chapel, while another fills it.
Orrery
This is a mechanical model of the solar system. (Heliocentrism in the 15th century? Interesting.) It appears to be in disarray, and the MS-2 says it has collapsed, though I'm not so sure it's not supposed to be like this at first. On one of the eight sides of the room is a puzzle with nested rings where the object is to get a sun symbol into the center. The puzzle then forms a vertical lemniscate surrounded by two concentric rings, which might be an infinity symbol. The central axis of the orrery also rises, aligning with something high up on the ceiling, which I can't see very well because of the interface limitations. (Who thought it was a good idea to only be able to look up and down 60 degrees?)According to the mapping function, there is an exit to the south, but so far I haven't been able to get through, due to there being a wood panel in the way. The scanner says it and the one on the west are screens. What kind of screens? For projecting images? Although they seem too darkly colored for that.
Cage
There was initially a cage in the center, with some sort of mutant lizard thing living inside. The cage consists of bars, with a pillar on each of four sides. Penscan says there is metal machinery inside the pillars, and turning a lever on one side causes the bars to fall in, killing the lizard. Curiously, the scanner says there are faint life signs detected. (Again, see below for speculation on that.)?
This room is apparently unfinished. The floor is unstable, and indeed, stepping on the bit in front of the east door causes it to collapse. (This is the only way I know of to get into the tunnels, covered below.) Algae cover a plaque next to that door, rendering it unreadable. Turning the large mirror in the southwest corner causes light to shine on the algae, which kills them but also releases a poisonous gas temporarily. Once the plaque is readable, it turns out to bear an inscription of a cracked cube with a key in front of it, as well as a keyhole. This is probably where the key from the stone block fits. However...Stepping on a particular part of the floor causes a door that was suspended over the north exit to fall, sealing off that exit. Escape is still possible, by falling down the hole in front of the east door, but getting back in is a problem I have yet to solve. Thus, I can't explore the room anymore for now, and I can't try the block key.
Tunnels
Probably from mining. Another Raptor known as Lincoln (is that a first or last name?) is encountered here. As the HUD says, very violent. There's no talking to this guy; he'll just shoot if you get too close. I ended up killing him in self-defense, though I wonder if it's possible to get around him without a confrontation. But on the other hand, one can get extra bullets from his Sniper. As with the lizard, the scanner shows "faint life signs". Again, see below for speculation.There's also the other piece of the tapestry and a locked chest, which the well key fits. Inside is an amulet with the name Oisin on it. Next to the chest are some human bones that show evidence of the person having been eaten (!) as well as an elephant gun.
Finally, there's an opening into the side of the chasm that divides the working area as well as a ramp leading up to the main level (which can only be lowered from below, oddly enough, with a rope). Near the ramp is a door leading to the floor on the west side of the working area, but there's only another stone block there, so it doesn't seem useful.
Not quite dead?
What's going on with Oisin's corpse, the lizard, and Lincoln? Well, I'm just going to come out with my suspicion: Grailstone. I still don't know what it actually is, but it's explicitly stated to be what sustained the Templars' lives for 600 years until Malik stole it. Oisin appears to be really dead, but his corpse is remarkably well preserved for being 400 years old. Maybe he wasn't affected as much?Closely related to these three is Lurka, who claims to have been one of the slaves that helped build the temple. He's been pretty severely mutated. Apparently, the lizard is severely mutated as well. This seems pretty bad.
Incidentally, if this Malik stole all the Grailstone, why are Lurka and that lizard still alive when Sir Guy died without it? Did they keep shares, or is something else going on?
Mystery items
Among the items I'm carrying at this point in the LP are the block key (again, probably fits the lock in the unfinished room, but I have to get in there first), an elephant gun (I haven't found a beast I might need to shoot with it), the Oisin amulet (for warding or does it actually fit something?), and the shield (the fact that it's named "Shield I" suggests there will be other shields).EDIT: Got unstuck with iqzulk's help. Thanks.